
Resources & Support
Protocols - Western Transfer (Western Blot)
Western Transfer, also known as Western Blotting, is a rapid immunoblotting technique for identifying the presence of a particular protein in a complex mixture of proteins such as cell lysates or sera. The technique exploits both the efficiency of SDS-PAGE to separate a mixture of proteins into distinct protein bands, and the ability of immunochemical reagents to interact specifically with a given protein antigen.
A typical Western-transfer protocol (e.g. for the detection of protein X) includes the following steps: [1] The proteins in the tested solution are separated into distinct bands by SDS-PAGE, [2] The size-separated proteins are transferred from the polyacrylamide gel to a nitrocellulose membrane (or another suitable matrix). [3] The membrane containing the protein bands is serially incubated with: [a] a suitable blocking reagent to prevent non-specific protein binding, [b] a wash solution to rinse any unbound blocking reagent, [c] a probing antibody (anti-protein-X antibody) that forms a specific immune complex with Protein-X, [d] additional wash solution to remove any unbound antibody, [e] an enzyme-linked antibody that binds specifically to the Fc region of the anti-Protein-X antibody, [f] additional wash solution to remove any unbound enzyme-linked antibody, and finally, [g] a substrate solution, which in the presence of the enzyme, yields an insoluble, colored product that precipitates at the site of the immune complex, thereby rendering the Protein X band visible (Figure III-1).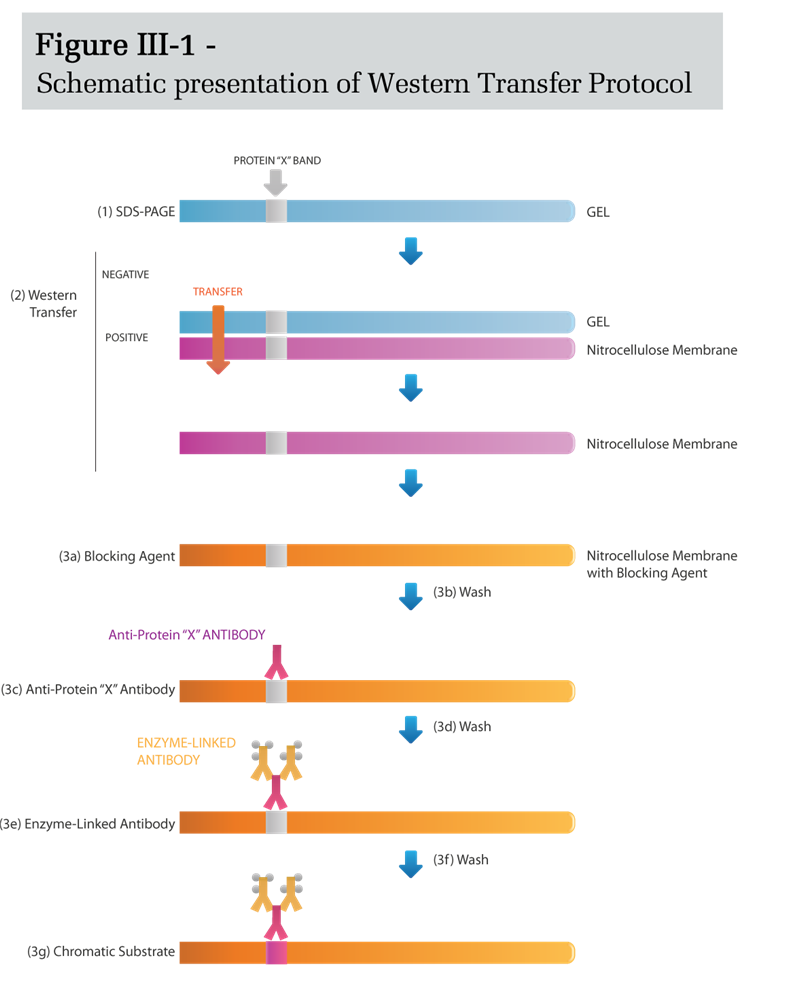
Materials Needed:
- SDS-PAGE apparatus and accessories
- Submerged Western Transfer Cassette and accessories
- A nitrocellulose membrane, approximately the size of the gel, presoaked in Western Transfer Buffer* for five minutes. (Note: The membrane should be handled with gloves and clean forceps to avoid contamination with extraneous proteins.)
- *Western Transfer Buffer (1/2 x TOWBIN)
Tris Base..............1.45g (12mM final concentration)
Glycine..................7.2g (96mM final concentration)
Methanol..............200mL (20% final volume)
diH2O....................add to 1.0L final volume - Antigen specific probing antibody (Primary Antibody)
- Secondary antibody (Donkey-anti-probing antibody species conjugated to Alkaline Phosphatase)
- Commercially available alkaline phosphatase conjugate substrate kit
Transfer Protocol:
- Load the protein sample onto a 4-20% Tris-Glycine polyacrylamide gel and run until desired resolution is achieved. (The electrophoresis can be followed by using pre-stained molecular weight markers).
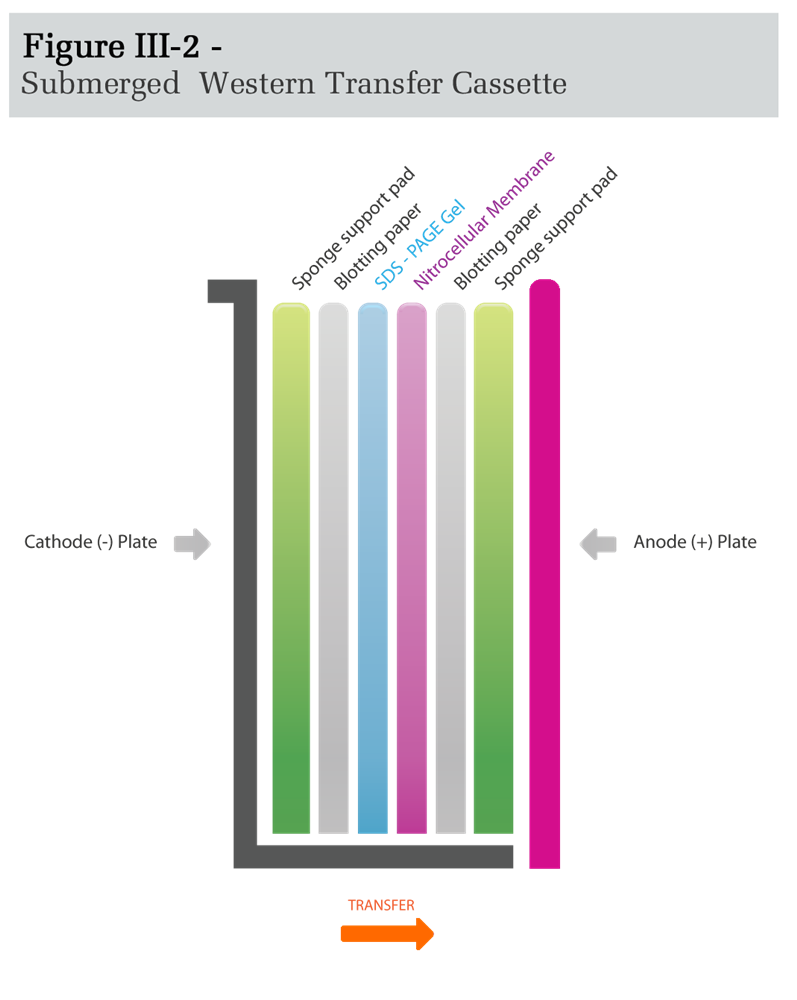
- Set up the Submerged Western Transfer Cassette as described below and in Figure III-2:
- Submerge the open Transfer Cassette cathode plate onto the tray pre-filled with Western Transfer Buffer.
- Place a sponge support pad onto the cassette and remove the air bubbles by gently rolling a Pasteur pipette over the pad.
- Place a piece of blotting paper onto the sponge support pad.
- Remove the gel from the electrophoresis plates, cut off approximately the bottom 3mm of the gel so that the membrane can be laid flat against the gel, and place the gel over the blotting paper. Expel air bubbles as before.
- Carefully place the pre-soaked nitrocellulose membrane onto the gel and expel air bubbles. Ensure that the membrane remains directly over the gel before proceeding.
- Place a second piece of blotting paper onto the nitrocellulose membrane and remove air bubbles.
- Place a sponge support pad onto the second piece of blotting paper and remove air bubbles.
- Gently close the cassette by placing the anode plate over the exposed pad.
- Carefully place the assembled cassette into the transfer tank containing Western Transfer Buffer up to the "pre-fill" level and adjust the buffer level, as needed, after the addition of the cassette.
- Connect the assembled apparatus to an electrophoresis power supply and run for approximately 1.5 hours at a constant current of 400mA.
Development (Immunostaining) Protocol:
- After the transfer is complete, incubate the membrane in blocking solution (3% Nonfat Dry Milk in diH2O) for 30 minutes with gentle agitation on an orbital shaker.
- Wash the membrane three times with TBST (TBS, pH 7.2 with 0.1% TWEEN-20) in a clean tray on an orbital shaker; each wash lasting 5-10 minutes.
- Dilute the probing (primary) antibody in TBST to a volume of 50ml (approximate final concentration of 0.20µg/ml) and incubate the membrane in the antibody solution for one to four hours at room temperature. (The optimum incubation time depends on the antibody/antigen binding affinity and must be pre-determined for each antibody.)
- Wash the membrane three times as in step #2.
- Dilute the secondary antibody in TBST according to the manufacturer's specification. Incubate the membrane in a clean tray containing 50ml of diluted secondary antibody for one hour at room temperature on an orbital shaker.
- Wash the membrane three times as in step #2.
- Color development requires the use of a commercially available (e.g. Bio-Rad or Sigma) alkaline phosphatase conjugate substrate kit. Follow the manufacturer's instructions.
- After the bands become clearly visible, stop the color by placing the membrane in a tray containing diH2O for at least ten minutes.